Introduction
At the most basic level, a full outfit for men consists of a T-tunic, a belt, a hat, pants and shoes. A full outfit for women consists of an underdress, some type of overdress (multiple overdresses in some cases), possibly a belt, a hat/headgear of some kind and shoes. Also, accessories such as pouches and jewellery are recommended.
The SCA only requires an ATTEMPT at pre 1600 clothing. NEVER feel like what you have isn’t good enough to go to an event!!
Fabric
The three biggest fibers used in the medieval times were wool, linen and silk. Cotton wasn’t used very much before the industrialisation of the textile industry, but as it is the most common fabric you can find today (and also nicer on your wallet) it is still used frequently in the SCA. As a poor university student you may find it difficult to avoid polyester (plastic) content in your fabric, which is fine, just remember this: the more natural fibers, the better. They are breathable where polyester is not, and if you accidentally catch on fire, natural fibers won’t melt onto your skin. Also, they are period (obviously).
When looking for fabric, you want the smooth, woven kinds. Examples of period fabrics include: Taffeta, poplin, voile, calico (not printed), 2/2 twill (not denim), satin, damask, brocade, velvet, shot silk, chambray. Avoid these: lace (exclusively used in late period starting from 1500 onward), gabardine (from Victorian era so not strictly period, but could be used as a substitute for other things), tulle, flannel, knits.
Colours
Choose solid colours, or yarn-dyed stripes, checks or tartan. Shot silk is also a viable choice. Do not get printed fabric unless you can find evidence for it being used in the period you are making garb for. Avoid super-bright colours – they’re really only possible with modern dyes, especially bright pink. Black and red were quite expensive to make as was purple (although purple can be created by overdyeing). Blues and greens are always fine as are neutrals (brown and ivory). If in doubt, choose more muted colours. Also remember that they weren’t dyeing bleach-white fabric.
The above paragraphs are a summary. For a more in depth look at fabric, as well as some places you can buy fabric, stitches you can use and a guide to eyelets and lacing, check out this document by Emmeline of Ansteorra.Measurements
There are lots of more specific measurements that might be needed for more complicated items, but here are the general measurements you will need to make the T-tunic. You will need a tape measure and a friend to help you measure. You may use cm or inches, so long as you are consistent!
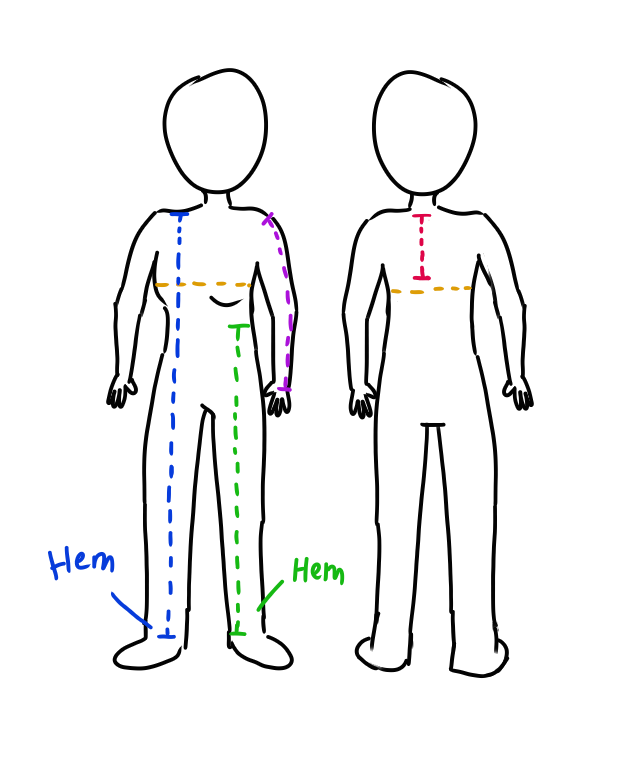
- Chest (orange on the diagram): Wrap the tape measure around your chest, at the widest part. This measurement informs the width of the garment, which will be the chest measurement divided by two.
- Arm length (purple on the diagram): Start measuring from where your arm separates from your body. Most modern clothes will already have a seam running around the beginning of the sleeve which will help show you where to start from. Then measure down to where you want the cuff of the garment to sit at the end of your arm.
- Arm width: This measurement describes how wide your armhole will need to be to fit in your arms. Measure around the top of your arm or your bended elbow.
- Length of garment (blue on the diagram): Start measuring from the middle of the shoulder. Most modern clothes will already have a seam running along the shoulder which will help show you where to start from. Then measure down to where you want the hem to end. For a T-tunic, that will usually be knee length for masculine garments and floor length for feminine garments.
- Natural waist to hem (green on the diagram): Your natural waist is between your hip bones and your rib cage. This is where you want your gores to start from. That way, they will give enough room for your hips and butt. Measure from the natural waist to wherever you decided you wanted the garment to end when you were measuring garment length (knee length for men, floor length for women).
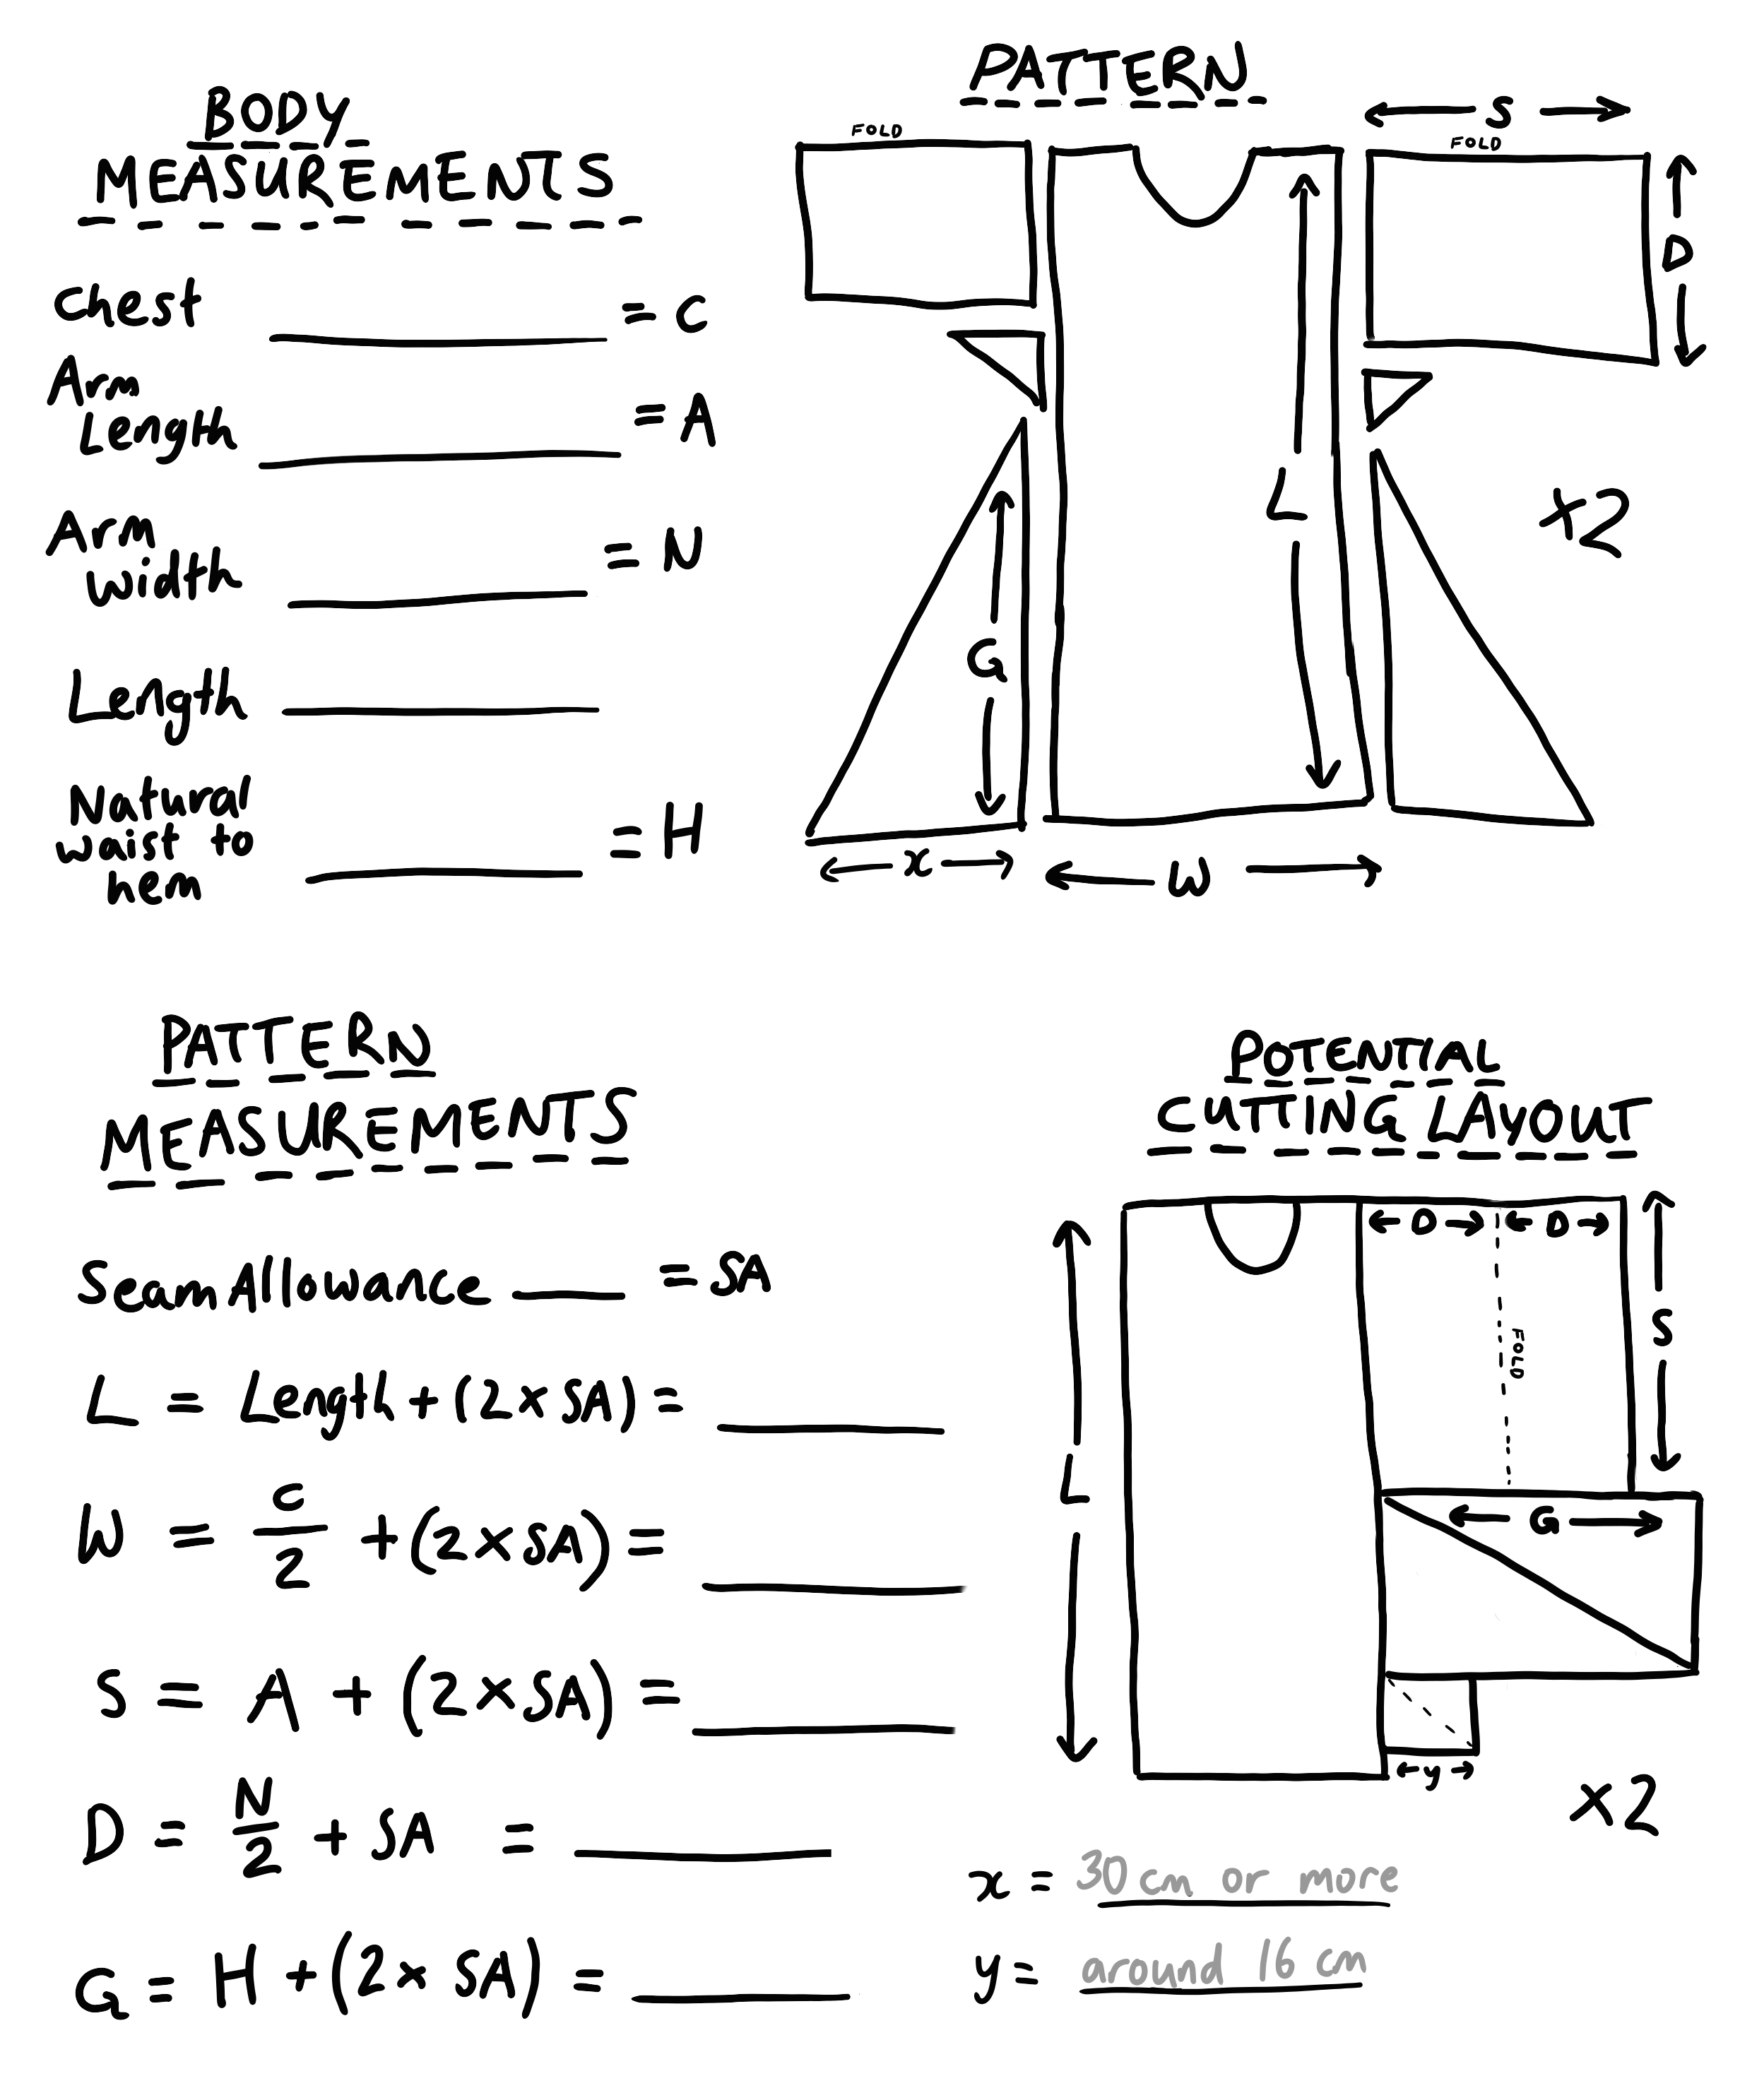
The T-tunic / underdress
You can click the below image to see a version that is suitable for downloading or printing.
Notes
About an inch (2.5cm) is the recommended amount for the seam allowance. If you’re really worried, allow for more. You can always take garments in if necessary.
Don’t forget that you need to hem your edges or they will fray.
It’s a good idea to make a cutting plan. This will allow you to fit your pieces such that they use the most efficient amount of fabric. If you’re not sure how much fabric you will need, a cutting plan will help you to determine this.
Sew the front to the back LAST.
Sew the underarm triangles first to the arm, then to the body.
Don’t cut the neckline too big. Remember it needs to be hemmed so will be slightly larger than cut. Also, the neckline should be shallower on the back side.
A simple overdress
For those dressing in the style of medieval women
If you are dressing in the style of a medieval woman, you will probably want another layer over the top of your underdress, otherwise you’re not properly dressed. There are plenty of options for what you can wear over your underdress. You can create a dress called a kirtle using the same/similar pattern as the T-tunic/underdress but out of a nicer material and spiral laced at the front or on the sides. Here is a page from a very useful website called Rosalie’s Medieval Woman discussing kirtles.
If you made your underdress out of a nice-ish material, you can cheat and just make a sideless surcoat to go on top. Here is a tutorial for a sideless surcoat. (Alternative tutorial from a different website if you’d like a different explanation.). Normally a sideless surcoat would go on top of a kirtle/gown, which is on top of the underdress, but in Australia that may not be ideal – it gets so hot!
Here is a resource for making the Viking apron dress which is so favoured by people in Lochac. This is one of the simplest garments to construct, and looks very nice.
There are many many other types of overdresses, but as this is only a basic guide, you’ll have to do some of your own research if you’d like to make something more complicated. Good luck!
↓↓ (!) this page is under development (!) ↓↓
Hats
They’ve fallen out of fashion in modern times, but in the medieval era, no one walked around without one. In the SCA, people don’t wear hats as much as they did in medieval times because of our modern tendency to not wear hats, but it really completes an outfit. At the very least, get a plain straw hat for those sunny days! Here are some other hat types:
Masculine
Feminine
- Medieval Veil Wearing 101 – a document by Mistress Elen verch Phelip on veil under pinnings, constructing a basic veil, wimples, and how to wear a veil or veil and wimple combo. View her website here.
Belts, pants and shoes
You probably won’t be making these for your first garb (maybe not ever, when it comes to shoes!). In terms of belts, you can either go with a leather belt or a woven belt. The leather is probably easiest for a new starter to obtain; just find a not-too-modern looking belt in your cupboard or at an op shop and you’re ready to go! In terms of pants, just find the plainest looking pair in your cupboard. You want them to be discreet. Later on, you can try your hand at making some period ones, but for now, no one will notice if you just use plain modern pants. Shoes are more tricky. The majority of modern shoes look absolutely nothing like medieval ones, and they are rather difficult to make yourself. Just try to find some shoes that are leather, preferably boots or maybe flats for women. Usually, people don’t pay very much attention to your shoes anyway, so don’t worry if you can’t get anything like this.
Accessories
This is how to dramatically improve your garb with very little effort. Got a belt? Pouch. Got a neck? (I really hope so!) Necklace. If you’re a woman, perhaps you could add an apron to your ensemble? Layering turns good garb to great garb! Feeling thirsty after making all that garb? Hang a drinking horn off your belt (and fill it with booze… I mean water.)
Pouches
This would be my first recommendation. If you have a belt, you should have at least one pouch. Pouches are like medieval pockets, and they look really nice. Your pouch could be leather or fabric. The College of St Monica runs pouch making classes from time to time, so if you’d like to learn to make one, come to our A&S classes on a Wednesday evening. Check out our Facebook page for more details. If you can’t wait, here is a really basic pouch design to try at home!
Click here for Pouch Tutorial PDFJewellery
Who doesn’t want to show off their wealth with fancy jewellery? Unfortunately it’s slightly difficult to make yourself, requiring lots of materials. Luckily, there are many people at the larger medieval events (e.g. Rowany) who sell jewellery. Additionally,
Apron
If you are dressing in the style of a medieval woman, this is a really great way to add an extra something to your garb. Also, its just a useful thing to wear, and fairly easy to make! (If you’re very nervous about your sewing skills, you could start with an apron for confidence building :P) Here is a very basic guide:
…